Showing posts with label Decorating with Dimes. Show all posts

Thursday, March 14, 2013

A Quick Hat Rack for an Army Room!

After making over the Professor's room for his birthday, I had one piece of board leftover from the shelves that I didn't want to go to waste.  The professor has a TON of hats in his collection and they didn't have a home, so I decided that the best use for the last board was to make him a hat rack!  Even if you include the cost of the board ($5ish) all I needed was 2 packages of hooks ($3 each) the same container of free sample paint, a stencil for the lettering ($2) and a black sharpie marker.  I cut the board down a tiny bit, freehanded with the stencil, attached the brackets, and added two hanging brackets on the back (that I saved from some artwork we bought so they too were free) and we had a hat rack that was LITERALLY the hit of the room.
 I hung it below the shelving above his bed and he's good to go!
One hat rack for about $10.  A great way to use up leftovers and make a 9 year old VERY happy!

Sunday, January 27, 2013

A Birthday Boy Room Re-Do

The Professor is going to be having a birthday in the near future, and being a very grown up boy of nearly nine means that he wanted a more grown up room.  So for his birthday, he asked to have his room re-done in a military theme.  I was on board with this because I knew we could do it for a reasonable amount of money and without an insane amount of work.  These are all from my cell phone, so excuse the quality of the photography, but you'll get the idea!

Before:  Light blue walls, a group of star wars posters and a madras quilt bedding from Pottery Barn Kids.  Not a bad look, but definitely not military. 
After:  We painted the walls an army green color, (a compromise from the cammo walls that he wanted...) purchased a new quilt and sham from Pottery Barn Kids (using a bunch of rewards points so really negligible cost to us) and changed out the lamp shades. I also purchased six shelf brackets at $5 apiece from Lowes and two six foot pine boards at $8 each.  I had them cut in half at Lowes and painted them with a free sample of brown paint I had lying around.  Total cost for the shelves, $46, but I also had a half board left over.  (Project to come soon!)  They were then decorated with military themed items that he already owned.
Before:  More green and blue, cool car painting, and an absolute mess.  (To be fair, that probably won't change much!  He is, after all, a boy)

After: New lampshade and really cool artwork.  I got the poster online for about $15 and the frame at Hobby Lobby with a 40% off coupon.  I also got a tin ammo box at HL and filled it with all the small trinkets lying around on his dresser.

 And finally, I took his plain black bulletin board and covered the frame with cammo duct tape!  Super easy and only took me about 5 minutes.

 And there you have it!  While I still have one more military themed project up my sleeve for the near future, this was a quick room re-do that should last him well into his teens.  At least, that's the plan...


Tuesday, November 13, 2012

Simple Curtain Toppers

One of the things I love about our house is that the entire back is covered in windows.  We don't back up to another home, so we have a gorgeous unobstructed view of the backyard.  I wasn't interested in blocking the view but I did want to add a pop of color and soften the windows, so I decided to make some really simple toppers.  I started with this great cranberry colored decorator fabric that I found on clearance at Hobby Lobby for $7 a yard.  (LOVE clearance!)  I purchased 4 yards and still have some left over so in total I have about $30 into these toppers.  I also bought a coordinating taupe color that matched the paint color for the bands to hold them up.  My intent is to do a reverse for the window over the kitchen since the walls there are an accent red color.  I got them all stitched together and then stapled them to boards to mount above the windows.  Anyway, here they are:


 A photographer I am not...
 And another shot at night so you can see the color better...
In total, I have about $45 into this project, but there are 7 windows and I can probably get a pillow out of the leftovers.  Not bad price wise, and I love the extra color and softness they bring to the windows.  I should have guests more often, they spur me on to get projects finished!

Friday, October 26, 2012

A Quick Cushion Re-Do

I decided a few weeks ago to re-arrange my front porch to allow for more seating (since here in the south the front porch is an extension of your living room!)  so I brought the two wicker chairs down from our top porch and moved the glider over and was thrilled with the results.  What I didn't love was the worn out old cushions on the chairs.  Not only were they mildewed and faded, but the red stripe kind of clashed with the blue and brown stripe.  Just a bit.  The old cushions were over eight years old, so they really didn't owe us anything!  I really didn't want to spend any money on the redo, so I decided to see how cheaply I could do the re-do.

I started by ripping apart the old cushions.  Not only did I use the old pieces for patterns to cut out the new cushions, but I also re-used the zippers and piping cord.  The fabric I already had in my stash, it is outdoor fabric that I bought at least six months ago and never got around to using it.  Technically I guess the fabric was my only cost, I bought about three yards at maybe $8 a yard?  Don't really remember...
 I assembled the cushions by working backwards, and put the new covers over the old foam filler which was still in great shape.
 When I was all done, I had new cushions that work great on the front porch and only spent money on the fabric.  Originally I was going to get rid of the ottoman thinking it made the space too cluttered, but I do like to put my feet up with a good book, plus it makes extra seating in a pinch or a coffee table.  (And I had enough fabric so why not?)  I'm thrilled with the result!

Friday, July 6, 2012

Another Refinishing Project!

I have decided that in addition to being frugal, I am also a glutton for punishment.  How else could you possibly describe someone who decides to refinish a dresser in the garage, in the middle of summer in South Carolina?  Anyway, I found this dresser on a local classifieds page for $30 and couldn't NOT get it for our guest room.  While it was definitely an older piece in need of some TLC, it was also solid wood, a good size, and had ample storage for our guest room.  And did I mention that it was $30?  Plus it was right up the street.  Bonus!

Here it is, in all it's pre-refinish glory.  Ugly old knobs, water marks on the top, and just kind of sad looking.  (Go ahead, be impressed that I remembered a 'before' photo.)
 Here I am mid-project.  It was at this point I was cursing the whole process and wondering why I didn't just go to Ikea...
 And then, after a coat of primer, two coats of paint, fresh stain on the top, and some new knobs, I was thrilled with the outcome.  I'm loving the way it turned out, and I finished in time for some of our besties to come for a visit!  In total, besides the $30 for the dresser itself, I spent $25 on new knobs and about $20 on paint, stain, and polyurethane for a grand total of $75.  Not bad for a brand new dresser!
And now you see why I've been MIA for a while.
Well, that and I was at the beach.  ;)

Thursday, May 17, 2012

Something Out of Nothing

A while ago I got a magnet with some razor blades that I bought.  It was a nice magnet in terms of durability, magnetic hold, and size, but it wasn't exactly a magnet that I really wanted to display.  So, I got out my paper crafting supplies and got busy, and in less than 10 minutes had transformed it into a cute little magnet that I'm happy to have on my fridge!


I started with some simple supplies that I had on hand.  Since my kitchen has a lot of red and brown I picked these papers and card stocks.  I also pulled a couple of punches, a stamp, and a little clip embellishment.
 I started off by using mod podge to put the paper on and cut it down to fit the magnet after I had glued it on.  Then I sanded the edges and distressed with a little brown ink.
 
 Next I used my 'happiness' stamp and the punches and made this little oval tag.  I used the brown ink to distress the edges.
 Then I mod podged both pieces and let them dry.
 Finally I added some little dimensional foam stickies to the back of the oval to make it pop off the magnet a bit, clipped on the little clip, and had myself a little magnet!  And the best part is that it was FREE!!!  I love making things for the house, but the 'free' part makes it that much better!


Friday, January 27, 2012

20 Minute Curtains

I wanted to do a little something on the windows for Mistress's room, but really didn't want to put up curtains or toppers. We love the moldings around our windows, and don't want to cover them up. When we first moved in here we tried some curtain toppers in her room that matched her bedding and I hated them when I got them up! So they came down and went back to the store. I had resigned myself to having bare windows when I came up with this super simple, inexpensive, and easy way to add a bit of color and whimsy to her room.

I bought 1/2 yard each of three different colors of fabric, and pulled two from my stash. FYI, 1/2 yard was WAY too much. I only ended up needing about 3 triangles of each color, so I have tons left over. Anyway, I spent about $5 on fabric, and another $2 on 3/8 inch white ribbon. I cut a bunch of triangles using a paper triangle that I had made for a pattern. Make sure to use a pinking rotary blade or pinking shears so your fabric doesn't fray.
Then I just stitched the triangles in random patterns to the ribbon and stitched a loop at each end. A few small tack nails in the top of the molding where the holes won't be seen if they are removed and I had an inexpensive solution for curtains!
These would be great in a boy's room as well with boy colors, or in a playroom in bright primary colors. The possibilities are endless! I actually first made these several months ago for the baby shower that I helped throw, and they would be great for decor for any party you could imagine.
And here's the full effect! I love the color that it adds, and am happy with how much impact a simple little project can have. Be impressed that her room is clean, I cleaned it this afternoon and then banished all the kids to the outdoors. It was 65 and sunny here today, way too nice to be inside!

Sunday, January 22, 2012

Growth Chart

A while back I found a really cute growth chart at my favorite store, Pottery Barn. It was 6 feet long and shaped like a ruler and was perfect for our home. Unfortunately I just couldn't get past the price tag. I don't remember exactly, but I think it was between $80-$99. Ouch. So, when we had the laundry room painted and our painter covered over the kids' height marks, I decided it was time to finally get around making one for our house! I didn't take step by step photos, but the process was the same as our family name plaque. (Only on a much bigger scale!) The only thing you need to remember is to see how high your base molding is, then add an inch or so and start your growth chart at that point. Our base molding was 4 1/2 inches, so I added a 1/2 inch and started the bottom at inch number 5. That way you can hang it high enough to clear the molding and none of your foot markers are at the top or bottom of the chart.
Check out the results!


And the best part? Mine only cost $6 for the piece of wood. Everything else I already had on hand. The paint was leftover from one of our bathrooms, the tissue was ironed out from a Christmas gift, (yes, you really can iron tissue paper. Lowest heat possible and no steam, works great!) and the inks, modpodge, and marker were all things I already had in my stash. I even had the hanging bracket for the back! I made sure to record all the kids' heights from the laundry room before our painter covered them over, so I'll add them back in and we'll have a family keepsake that will be around for decades to come. Lord willing, our grandkids will be on there someday!

Saturday, December 24, 2011

The Tenth Day of Christmas Crafts: A Framed Quote

I love this quote and just had to have it in my house somewhere! I printed it out on my computer on card stock, distressed the edges, matted it, and framed it in an old frame that I did a really quick paint and distress job on. I can change the quote any time I want to and I think it adds a bit of whimsy to the house!

Monday, December 12, 2011

The First Day of Christmas Crafts: Printing on Fabric

I make no promises, but I will make my best effort to make 12 Days of Christmas Crafts, starting today so that I will end on December 24th. Enjoy day 1!
I've been wanting to try using fabric in my computer printer ever since I saw it done on Pinterest. I found a great tutorial here and decided to combine it with this adorable pillow I found here. I can never do anything exactly as it tells me to though, so I changed a few things up a bit, namely adding border fabric around the printed phrase. I also used osnaberg instead of burlap, mostly because I already had some. This entire project was made with things I already had on hand, so it didn't cost me a dime!

Here's my phrase, all printed out. I was a little nervous putting fabric into my new printer, but it worked great and truthfully the fabric isn't much heavier than cardstock and that has always worked fine.
I trimmed my definition to the size I wanted and got busy adding the decorative fabric. Although I have no pictures, I just basically cut four strips of fabric 3" wide and stitched them to the edges, pressing the seams open and flat when I was done. Easy peasy! Then I decided that 3" was too much, so I trimmed it down to 1".
I lined the pillow with some warm and natural batting so that my stuffing wouldn't be lumpy and came up with an adorable pillow that works great with the ones we already have! If I had it to do over again, I probably would have just used the osnaberg and omitted the accent fabric, this is cute but I like the simplicity of the plain fabric. Who knows, maybe I'll get another one done this year yet, but until then this one works just fine!

Friday, December 2, 2011

Laundry Room Transformation

When we moved to our new house, I was thrilled to finally have a laundry room that wasn't in a basement. Unfortunately, it was completely utilitarian and boring. It also lacked some functionality. It had a shelf that ran the entire length of the room, which was often too high for me to reach and didn't take advantage of the 10 foot height of the room at all. And let's face it, white on white on white on white is boring! So with not too much money and a little creativity, I changed my boring laundry room into something that was cheerful and comfy. Plus, it is pretty much where I spend most of my time so I may as well make it enjoyable, right?

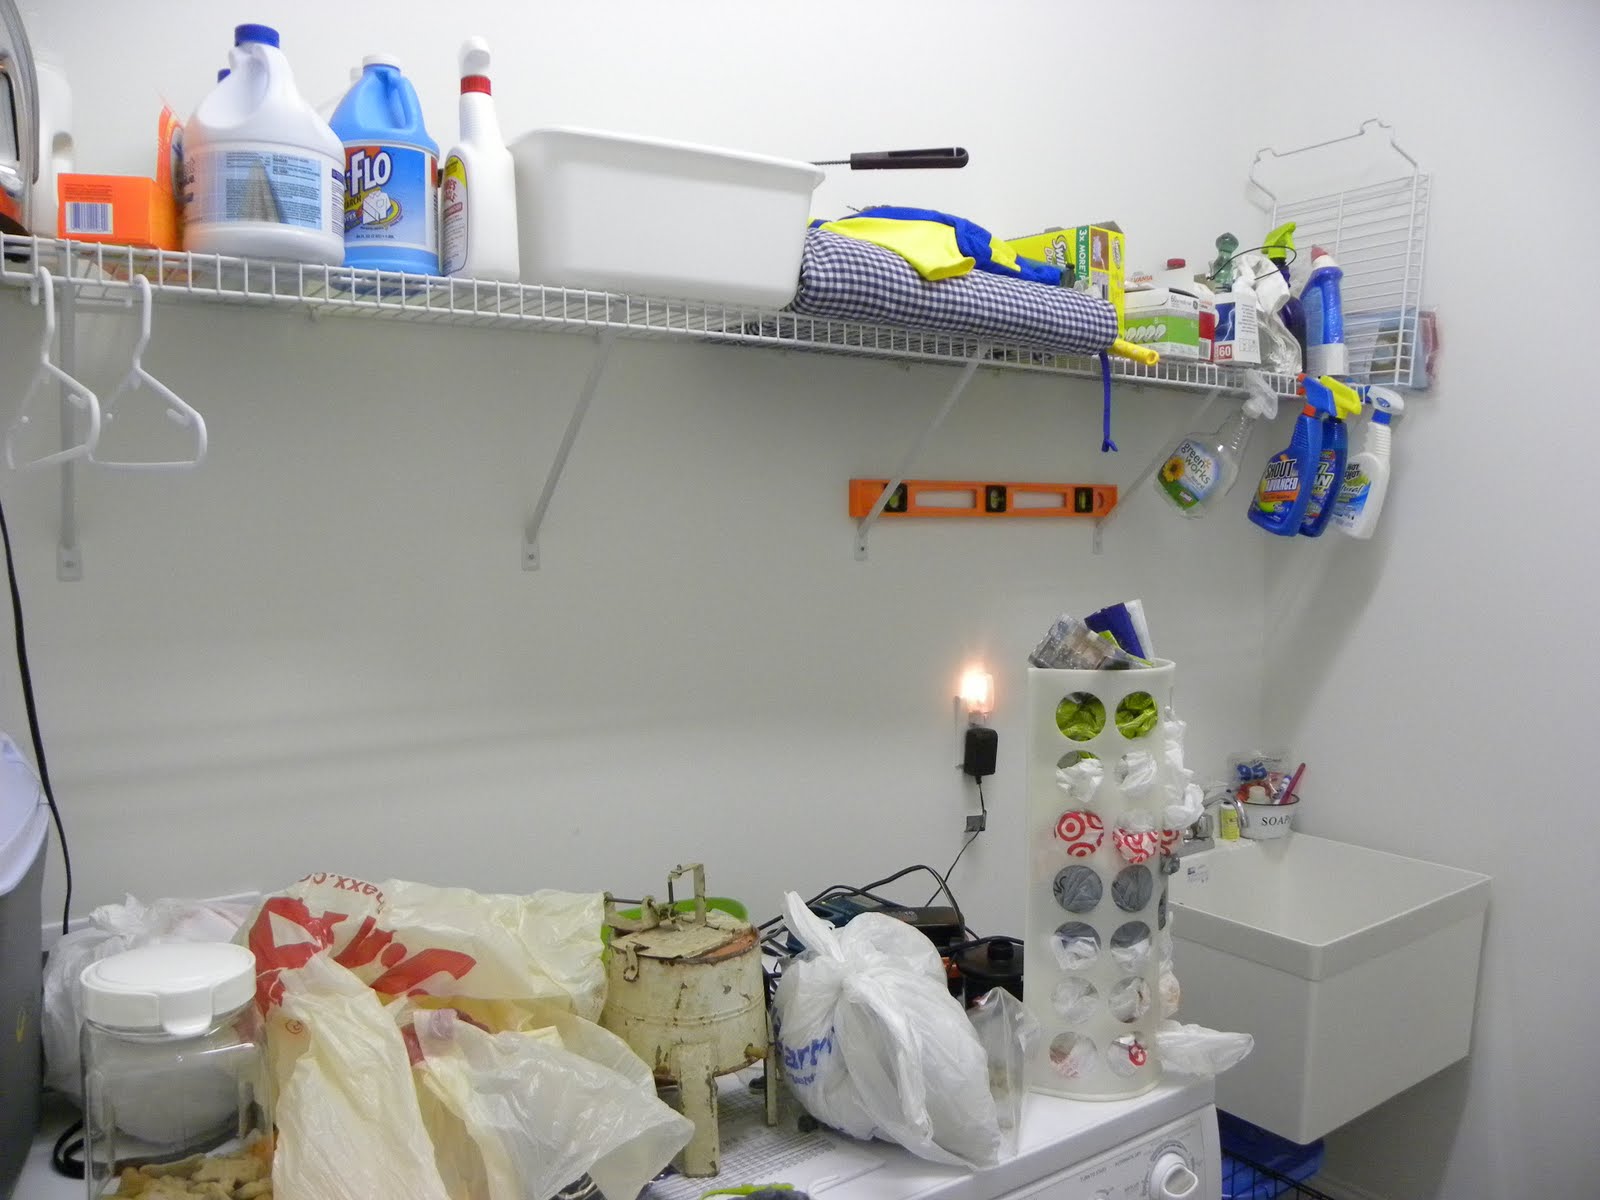
Before: Builder white walls, less than functional shelf, cold tile floor. See how difficult it was for me to keep this place organized? Everything got shoved to the back of the shelf and then I'd need to get a stool to reach what I needed.
Boring hamper that didn't hide anything at all. Not that I don't love having our dirty underwear on display, but I wanted to go a different route!
Another shot of the main area of the room. It was just a dumping ground for anything that didn't have a home. Plus there was nowhere for me to put all the dog's stuff. Sitting on top of the dryer wasn't good, a three year old can feed the dog enough treats to make her puke. Not that I'm speaking from experience or anything...
After: I chose a fresh green color for the walls because I wanted the white of the cabinets and appliances to pop. The cabinets are from Ikea. Ikea is a great option for affordable cabinets. These two were $175 apiece and offer a much better way to store all my laundry and cleaning stuff that that old shelf did! Now all those things are organized and hidden from view. I also added the fun 'Laundry' letters from Hobby Lobby, an antique toy washing machine that belonged to my grandmother when she was a child, and a basket for all those lonely socks.
Here's the area above the sink. I put up a little shelf ($15 from Lowes) and put all the dog treats up high out of the reach of little hands. I also added a soap container I already had and a huge clothespin that I made in 8th grade shop class. Eventually there will also be a small drying rack from Ballard Designs, but it's backordered until February. Sigh...
And finally I replaced the old hamper with this one from Home Decorator's Collection. I had seen dozens of these for well in excess of $150, but this one was only $49. It hides all the dirty underwear, and because it's smaller it forces me to keep up on the laundry. I also added a throw rug to keep my feet warm on those cold tile floors.
So there you have it! A quick laundry room re-do. I also plan to add a countertop above the washer and dryer for a folding space, but haven't gotten to it yet. For now I'm done, and don't completely hate doing laundry anymore!
(Oh and for the record, that shelf will find a new home in the garage where it can store coolers and toys and be much more appreciated. Waste not want not!)

Wednesday, November 30, 2011

Amping up Garland

We've all seen those amazing garlands from high end stores that cost in excess of $50. Absolutely gorgeous, but really, who wants to pay that much for something that will sit in storage 11 months out of the year? I figured that with a little ingenuity I could make something that worked just as well without blowing the budget. Personally, I think it works just as well, read to the end and decide for yourself!

The supplies: One 9' evergreen garland from Michaels, $2.49 and one 6' holly garland, $6.49 on sale. I always start with the evergreen and choose fluffy accent to go with it. Today it just happens to be holly! Lay your evergreen garland out and fold it in half. Twist in several places to secure and fluff the entire way down.
Lay your accent garland on top of the fluffed evergreen. Work your way down twisting the evergreen in several places to secure.
By working the accent garland down into the fluffed evergreen you will hide the chain and make it more natural looking.
Twisted like a twist tie. Re-fluff and you won't notice the twist.
All finished! See how full it looks?
You could add lights as well, but as this one was going on my chandelier I didn't. If you add lights, do it before you add the accent garland so that the wires are hidden.
So what do you think? Not bad for $9 huh? Happy Holidays!