Wednesday, December 22, 2010

A Birthday on a Budget

Kids' birthday parties have exploded in the past couple of decades. I can remember the parties my mom threw for us as kids. We never had a bounce house or costumed characters. We had simple homemade cakes, a few friends, and got to run around doing our own thing. Sure, we may have had a pin the tail on the donkey game or something, but nothing extravagant. And you know what? We had fun. It didn't matter that there weren't gift bags at the end worth $10 apiece or whether the cake came from the best bakery in town, we had a good time regardless! Now don't get me wrong, if you want to take the time to go all out with your child's party there is absolutely nothing wrong with that, I have done it myself. I have just chosen in the last couple of years to downgrade a bit to save my own sanity!

My youngest son had the unfortunate luck to be born on December 22nd. It's a bad time of year to throw a birthday party. Everyone is in full holiday mode, and there aren't too many people who want to take time to go to a child's birthday party. Nonetheless, it is still his special day and I never want to overlook his birthday. This year I asked him what he wanted to do to celebrate. He decided to have his two best friends from preschool over to play and have cake and ice cream. He loves Legos and Star Wars and so I made his party into a Lego theme with Star Wars undertones. I didn't spend more than about $10, and he had a fantastic party! Here's how I did it...

Project: A Lego Birthday on a Budget
Time: Maybe an hour
Skill Level: Easy Peasy!

The cake: I used one cake mix prepared using the instructions given, and poured 4 cupcakes, then put the rest of the mix in a well greased 8x8 pan. Bake according to the instructions on the box. Remove from oven and cool completely.
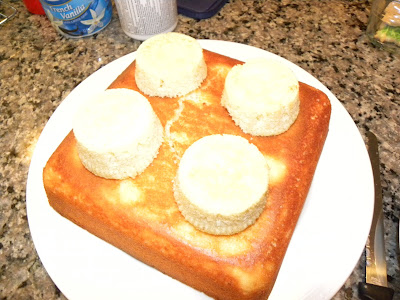
Slice the tops off of the cupcakes. Sample the tops. After all, you need to make sure they are fit to eat. :)
Put your square cake on a platter, slide strips of waxed paper under the edges. This will keep your plate clean while you frost. Coat the square with frosting. My son's favorite color is yellow, so we had a yellow Lego.
Add the cupcakes to the top and frost completely.
I used a tube of yellow gel (found in the baking aisle at the grocery store) and wrote 'Lego' on each cupcake. I am obviously not a professional cake decorator, but my son loved the final effect which is really all that matters!
Carefully pull out your waxed paper and throw it away and you are finished!
Next I decided to carry the Lego/Star Wars theme through in the favors. I found these puzzles at the Dollar Store and got one for each of the two boys coming to the party.
I wrapped them each in solid color paper. What do you think, looking Legoish yet?
Next I used a circle punch to punch out six circles for each box.
Then I adhered them to the boxes and used a red marker to write 'Lego' on each circle.
Add in a couple of small candy bags and we had a complete Lego/Star Wars birthday for under $10. The cake wasn't perfect, but the kids thought it was cool and knew what it was, they loved the favors, and they all had a great time at the party. I'm going to go ahead and call this birthday on a budget a complete success!

Tuesday, December 21, 2010

Felt Cookie Cutter Ornaments

We've all seen the cute little package tie-ons at the store. They add a finishing touch to any wrapped gift and come in endless varieties to suit any kind of present recipients. While usually not terribly expensive individually, if you want to put them on a number of presents the cost can add up quickly! Here is a simple and cost effective way to add an adorable tie on to your gifts this season! (While I don't know the exact cost, a full sheet of felt is usually $.20-$.25 apiece and you could easily get 3-4 tie-ons out of each sheet.)

Project: Felt Package Tie-Ons/Ornaments
Time: 15 minutes each (ish)
Skill Level: Easy Peasy!

Step 1: Pick your cookie cutter. It works best to use simple shapes that don't have a lot of turns. The easier the shape, the quicker the project!
Trace your shape on a piece of card stock. Cut out.
Spray your cut out shape with repositionable spray adhesive. Do not use permanent adhesive, you want to be able to remove this shape eventually. Allow your adhesive to dry completely before adhering it to your felt.
Cut two pieces of felt large enough to accommodate your shape.
Stick your card stock shape on the felt and pin the two layers together to keep them from shifting.
Stitch around the edge of the card stock shape. I used a contrasting color, you can use the same color as the felt if you wish. Get creative!
Leave an opening to stuff the shape. Pull the two threads through and tie them off.
Lightly stuff the shape with stuffing.
Hold the shape closed and stitch the opening shut.
Pull the two threads through and tie them off. All your threads are now tied.
Using a needle, pull the threads into the center of the ornament to hide them. Clip your threads off.
Trim about 1/8" from the edge of your stitching line.
Now you have your ornament. From here you can embellish them with ribbon, buttons, etc either by sewing or gluing.
I chose the simple route. I made two, punched a hole in each using a crop-a-dile, and threaded string through to make a pair of mittens. They make an adorable package tie on that can easily be reused as an ornament!
For another option, make several of these and use them on a garland, in a wreath, or on a tree!
Quick and simple, the possibilities for these are endless and they make a perfect way to add a personal touch to your package this Christmas!

Happy Holidays to you all and thanks so much for reading my blog! Enjoy your time with your family and I'll see you in 2011 with new projects to keep us all busy!

Tuesday, December 14, 2010

Jeans...Transformed

I have a love/hate relationship with fashion. I love wearing the current styles, but hate having to spend the money to change major parts of my wardrobe when the magazines say I should. Case in point, in recent years boot cut and wide leg jeans were all the rage, now we have moved on to a more tapered leg style. (Which honestly I like better anyway since the boot cut ones always seemed to drag the ground and get soaked on rainy or snowy days.) I owned one pair of the more tapered style, and the rest of my jeans sat unused in the closet. I didn't really want to go out and spend the money on new ones since the ones I had were still perfectly good, but I needed more than one pair of jeans in my closet. One day it hit me... just restyle the ones I already have! I tried this first on a pair of thrift store jeans I already had to make sure it worked, then I was off and running. After all, cutting into relatively new Banana Republic jeans is not for the faint of heart, even if they were on clearance!

Project: Jeans...Transformed!
Time: 1-2 hours
Skill Level: Not too bad (as long as you have a little prior sewing knowledge)

And here they are. What I started with. One pair of Banana Republic jeans that I got on clearance last year for a ridiculously low price. As you can see, they are definitely of the boot cut variety.
Look at the legs of your jeans. You will be working on the standard seam, not the flat felled seam. The standard seam is usually the one that runs down the outside of the leg.
I used a pair of jeans that I already knew I love to get the same leg width on the pair I was transforming. Turn both pairs of jeans inside out and make sure that your standard seam is laying flat. Usually this means that your flat felled inseam is laying on top somewhere, this is fine. Line up the inseams and pin along the edge. Make sure your jeans are laying the same way, not butt to butt or front to front. They should be butt to front or front to butt. Not my best description ever, but you should get the idea!
A little closer view of the inseams pinned. You can see how the flat felled seam comes to the top.
Now, using a marker (I used Sharpie) trace the new leg shape on the pair of jeans you are altering. Make sure to bring your line all the way up past the original seam, taper it in so that you don't have a point at the hip. No one wants that! You won't be taking much out of the hip/thigh area anyway, mine finished well below the pockets.
Put that seam ripper to work! Go ahead and rip out the hems, and get rid of all the loose thread.
Extend your line to the end of the jeans and pin along your marker line.
Stitch along the line with the edge of your presser foot running along the line.
Cut along the marked line. Save the piece you cut off for a bit.
Serge (if you have a serger) or zigzag along the seam to finish it.
Press the finished seam to one side.
Fold your seam back up and pin, stitch back into place. I used a #100 Jeans needle. I also used jeans thread, wind it onto the bobbin and use a matching thread for your top thread. Stitch on the wrong side and the jeans thread shows on the right side of the jeans. STITCH VERY SLOWLY over the sides where the seams come together. These are extremely thick and if you go too quickly your needle will break. Trust me. Do not backstitch, pull the threads through for a finished look. See below for instructions.
Lay the piece you cut off on the other leg, this time lining up the standard seams. Pin and trace with the marker. This way you have the same amount taken out of both legs.
Repeat the process of ripping out the hem, pinning, sewing, cutting, serging, re-hemming etc.
Each hem now has two sets of threads to pull through and tie off. Pull the top thread carefully so as not to break the it, (In my pair the top thread is grey) and your bobbin thread should pop up in a loop. If it doesn't pop up, just use a needle to bring it through. Sometimes they get caught. Usually when you are in a rush.
Use a pin or needle through the loop to pull the bobbin thread through.
Tie 2-3 times and thread through a needle.
Push the needle between the layers of fabric, starting as close as possible to the knot you tied.
Turn your fabric over to make sure your needle is indeed in between the layers.
Push the needle all the way through and pull firmly, this will cause the knot to be buried. Clip your threads. Turn right side out.
Voila! Newly tapered jeans, costing only pennies to transform! I'll bet you have a pair in the closet right now that you can try this out on!

Monday, December 13, 2010

Irony in a Candle Jar

(I know, it seems ironic that my first post on a sewing blog wouldn't have anything to do with sewing, but things just work out that way sometimes!)
I love scented candles. You know the kind, those big jar candles that fill the house with delicious scents just by opening the jar. Every winter we go through a ton of them, they are lit almost from the time we get up in the morning until we go to bed at night. The problem I have always had is that when they are all burned up you are left with a charred waxy jar that would otherwise be useful for something, and I hate to throw away something that could be useful. I decided that I was going to play with one of those jars to see what I could do with it. Maybe you'll find some use in a jar you have laying around!

Project: Repurposed candle jar.
Time: About 20 minutes actually working, more to freeze the candle
Great for: Teachers, Neighbors, Bus Drivers, Etc!
Skill Level: Easy Peasy

Take your spent candle jar and put it on ice. Literally. Put it in the freezer for at least an hour or two. Overnight works best.
After your candle has sufficiently frozen, remove it and put it on something to protect your work surface. In this case, my daughter's bib was already there so it became my cushion.
Take a dinner knife (NOT A SHARP ONE!!!) and use it to loosen the frozen wax from the jar. When the wax is frozen it usually pops out pretty easily. Break up the wax with the knife and remove it.
Make sure you get the little silver wick holder out too, it sticks sometimes. When you are finished, clean the jar thoroughly in hot water to remove all wax traces, scent, and soot. This is also a good time to remove any labels that are on the jar.
After a little elbow grease you are left with a nice clean jar. Dry well before you move onto the next step. It also helps to let it sit out open for a while before filling to completely remove any trace of scent.
Rub on decals are available at any major craft retailer. This pack was about $5, although most places have 40% off coupons all the time. I used half of one sheet for one of the jars, and a decal I already had for the other. One pack will create a lot of jars!
Add ribbon around the neck of the jar and fill with wrapped candy of your choosing! I'm going to tie a Starbucks card around each jar as well and give them for teacher gifts. Happy Holidays!