Tuesday, November 13, 2012

Simple Curtain Toppers

One of the things I love about our house is that the entire back is covered in windows.  We don't back up to another home, so we have a gorgeous unobstructed view of the backyard.  I wasn't interested in blocking the view but I did want to add a pop of color and soften the windows, so I decided to make some really simple toppers.  I started with this great cranberry colored decorator fabric that I found on clearance at Hobby Lobby for $7 a yard.  (LOVE clearance!)  I purchased 4 yards and still have some left over so in total I have about $30 into these toppers.  I also bought a coordinating taupe color that matched the paint color for the bands to hold them up.  My intent is to do a reverse for the window over the kitchen since the walls there are an accent red color.  I got them all stitched together and then stapled them to boards to mount above the windows.  Anyway, here they are:


 A photographer I am not...
 And another shot at night so you can see the color better...
In total, I have about $45 into this project, but there are 7 windows and I can probably get a pillow out of the leftovers.  Not bad price wise, and I love the extra color and softness they bring to the windows.  I should have guests more often, they spur me on to get projects finished!

Monday, November 12, 2012

A New Butler's Pantry!

I would be willing to bet that anyone who has ever built a house has at some point in time wished that they had done a few things differently.  I can honestly say that for the most part we have been very happy with all the choices we made, except for one.  

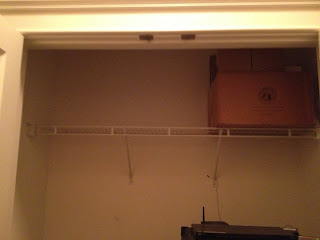
Everyone, meet our worthless closet: 
 Located across from the actual pantry, this closet was completely redundant and unused in the two and a half years that we have lived here.  The builder did put in one underwhelming wire shelf, but other than some empty cardboard boxes that I save for shipping, our stereo, and the broom, this closet was empty.  Empty and waiting for something better out of life...
 One of the options that we had when building was to make this area a butler's pantry.  We liked the idea at the time but really wanted to keep our final budget from getting higher than we had agreed on, so we had to pick and choose what mattered most to us.
But after a couple of years of saving we were ready to do what we originally wanted to this area.  Now I am a big do-it-yourselfer, but the most important rule to remember when doing something yourself is to know your limits.  This folks, was WAY beyond my skill level!  So, we called in a few experts and began the process.  :)  First up, the cabinet dude.  (No really, he calls himself Bruce the Cabinet Dude...)  He made this great sketch that we ultimately picked for our final design...
 ...and then we got the demo guys involved!  Here it is all cleared out up to the ceiling, patched and awaiting paint. 
 Next came the paint and then we waited for several weeks for the cabinets to come in.
 FINALLY the cabinets arrived and they began to go up!
 See this massive wad of wires?  This part sucked.  
(FYI, an HDMI cable is VERY fragile.  It is also expensive to replace.  Go ahead, ask me how I know...)

 Finally all the cabinets were back in, the stereo was hooked back up, and the wiring for the under cabinet lighting was complete. 
 Then we got granite that matched our kitchen, and a remnant at that.  BONUS!!!
 And then got the tile in for the backsplash to match the kitchen.  It ended up being a bit lighter than the tile in the kitchen since two years have passed, but I don't notice a big difference.
 And here it is from the same angle as the closet.  We LOVE the result and have so much more usable storage now.  The end result was worth every penny!

Friday, October 26, 2012

A Quick Cushion Re-Do

I decided a few weeks ago to re-arrange my front porch to allow for more seating (since here in the south the front porch is an extension of your living room!)  so I brought the two wicker chairs down from our top porch and moved the glider over and was thrilled with the results.  What I didn't love was the worn out old cushions on the chairs.  Not only were they mildewed and faded, but the red stripe kind of clashed with the blue and brown stripe.  Just a bit.  The old cushions were over eight years old, so they really didn't owe us anything!  I really didn't want to spend any money on the redo, so I decided to see how cheaply I could do the re-do.

I started by ripping apart the old cushions.  Not only did I use the old pieces for patterns to cut out the new cushions, but I also re-used the zippers and piping cord.  The fabric I already had in my stash, it is outdoor fabric that I bought at least six months ago and never got around to using it.  Technically I guess the fabric was my only cost, I bought about three yards at maybe $8 a yard?  Don't really remember...
 I assembled the cushions by working backwards, and put the new covers over the old foam filler which was still in great shape.
 When I was all done, I had new cushions that work great on the front porch and only spent money on the fabric.  Originally I was going to get rid of the ottoman thinking it made the space too cluttered, but I do like to put my feet up with a good book, plus it makes extra seating in a pinch or a coffee table.  (And I had enough fabric so why not?)  I'm thrilled with the result!

Thursday, September 20, 2012

Good Clean Fun

To begin with, (speaking from experience) this is a great project to do BEFORE you have cleaned your bathroom and NOT after.  'Kay?  

This little activity is nothing new, but it was something that I discovered had unintended but beneficial side effects.  My kids LOVE to play with baking soda and vinegar.  They love watching it bubble up and fizz and I love that their "experimenting" is completely safe.  I used to give them the baking soda to play with on a cookie sheet but quickly discovered that it didn't stay there, so in a stroke of genius I decided one day to pull the drain on the sink in the bathroom, fill it with baking soda, and let them play in there.  When I was finished I would just wash it all down the drain and be done, no huge messy clean up needed!
 What I discovered was that after this play time not only were my sinks clean, but also they drained a lot better!  I knew that baking soda and vinegar were good for cleaning and I knew that you could use them to clear a drain, but I didn't know that kids' fun could result in something being cleaner at the end than it was in the beginning.  Score one for Mommy!
 So now whenever I have a slow drain I dump some baking soda, pour some vinegar, and let the kids have at it.  But they don't know that they are cleaning so shhhh....

Sunday, September 16, 2012

A Little Catching Up...

I know, I know, I've been a little MIA since the great craft room makeover.  Believe it or not, I have actually used said room, just not a whole lot that is post worthy.  Here's what I have been doing!

I've gotten my fall garden planted, the beans, peas, onions, and broccoli are all coming along nicely!
 The spinach on the other hand, well, something is eating all the sprouts.  Not sure what, but they are eating the lettuce sprouts in my pots too.  Ugh.

 I've been supervising construction projects, this is the most well nailed pallet in the entire state of South Carolina.
 This is what happens when I tell Mistress that it's time for a shower.  My saving grace is that she ALWAYS forgets about hiding her feet.
 We went apple picking at Sky Top Orchard in the mountains of North Carolina.  It is absolutely beautiful up there, and if nothing else the hot apple cider donuts are worth the drive!  SO yummy!
Mistress turned 4, so I threw her a little party at the local YMCA water park.  We got rained out halfway through, but it was fun while it lasted!  The cupcakes were a fantastic recipe that I found and I finished them off with a simple buttercream.  I actually made the cake toppers, and the fabric I used for a little table accent later became a pillowcase for Mistress's room.
 The treat buckets were really fun, I was the crazy lady sitting outside the dollar tree switching handles and shovels so that they all matched.  Yup, I'm that crazy.

 
Bug brought home a simile book from school.  I'm framing this page.
 And finally, how fun to make faces in homemade ice cream for the kids?  They loved it!


Also, DH has just finished FIVE business trips in the last month, so I'm hoping that now that he's back and the kids are all in school I may just have time to do something else fun.  Until then!

Tuesday, July 31, 2012

Sewing Room Makeover!

When we moved into our house a little over two years ago, I spent all my efforts decorating every room.  I didn't rest until everything was put in order, walls were painted, pictures hung, and every pillow properly fluffed.  I stood back and sighed with contentment at the finished product.  Then five minutes after the I finished the kids used the pillows and blankets for a fort and I was back in reality.  Ha.  The craft room however, was a room that I never did anything to.  It was functional, it was mine, and it was BORING.  Here I am in a room that I am supposed to be creative in, and I had white walls, no decorations, (other than two displaced paintings that the boys did and no longer matched the new house and a purple sharpie scribble that Mistress thoughtfully added one day when I left a marker at kid level) and was generally a catch all for everything that needed to get out of the way when company was on it's way.  It needed help, and since I had an entire week where all the kids were in summer camp, (you might think I planed it that way) I decided to use the time to make over my creative space!

Here's the before.  Stuff everywhere, half finished projects, white walls, and no personality.
 I started with paint.  I decided on "Mystic Sea" by Valspar, which was a sea blue color.  It was exactly what I was looking for!  Also, DH got me a gallon of the two in one primer and paint which promised a one coat coverage.  For the most part, their claims held true!  I did have to go back and touch up a bit, but all in all I did one coat!
 And here's the after!  For starters, I cleaned.  Ha.  I also took the opportunity to go through everything and purge my stashes, after cleaning out some of the old stamping supplies I actually made about half of what I spent on the makeover.  I didn't get rid of anything crazy either, just some brads and decorative add ons that I never liked, and a few other miscellaneous things that didn't get used all that often.  (If ever!)  If there's one thing I've learned, it's that if you haven't used it in 2-3 years, you probably won't!
 Some of the details:  I framed a couple of bag fronts from fabric stores that I have visited, and I have a couple of extra frames for future places!
 Thread racks are a necessity in a sewing room, but I thought that framing them with some open frames would add a sweet decorative touch.  I love the way that it turned out!

 My amazing awesome wonderful fabulous neighbor moved a couple of months ago and asked me if I wanted these for storage.  Um, yes please!  I added a few extra fabric bins from Target and all of my stuff is now organized within an inch of it's life, plus I have a ton of extra space for future growth!
 There's another storage cube from the above mentioned neighbor, I use it for all my paper crafting supplies.  The storage above the cutting board is used for all the rotary cutters and scissors.  Not only are they right in reach for me, they are OUT of the reach of a certain little scissor addicted terror.
I traded in my plastic garbage can for this wicker hamper I found on clearance at Lowe's.  Much more stylish than the white plastic garbage can for storing rolls of fabric!
 And while this is not something that I made over, this is one of the best parts of my sewing room, the view into our backyard!  It's beautiful all year long, but we are close to the best time of the year when all the leaves change to vibrant colors. 
 

So there you have it!  One week, about $100, and I have a sewing room that I can really enjoy.  I can feel the creative juices flowing already, just not sure I'm ready to make a mess in there yet!

Friday, July 6, 2012

Another Refinishing Project!

I have decided that in addition to being frugal, I am also a glutton for punishment.  How else could you possibly describe someone who decides to refinish a dresser in the garage, in the middle of summer in South Carolina?  Anyway, I found this dresser on a local classifieds page for $30 and couldn't NOT get it for our guest room.  While it was definitely an older piece in need of some TLC, it was also solid wood, a good size, and had ample storage for our guest room.  And did I mention that it was $30?  Plus it was right up the street.  Bonus!

Here it is, in all it's pre-refinish glory.  Ugly old knobs, water marks on the top, and just kind of sad looking.  (Go ahead, be impressed that I remembered a 'before' photo.)
 Here I am mid-project.  It was at this point I was cursing the whole process and wondering why I didn't just go to Ikea...
 And then, after a coat of primer, two coats of paint, fresh stain on the top, and some new knobs, I was thrilled with the outcome.  I'm loving the way it turned out, and I finished in time for some of our besties to come for a visit!  In total, besides the $30 for the dresser itself, I spent $25 on new knobs and about $20 on paint, stain, and polyurethane for a grand total of $75.  Not bad for a brand new dresser!
And now you see why I've been MIA for a while.
Well, that and I was at the beach.  ;)

Thursday, June 28, 2012

Lest You Think I've been Eating BonBons...

We've been spending a ton of time outside this summer, so far it hasn't been overly hot (although that's ending this week, 106 tomorrow!) and so I've taken advantage of the weather to keep my garden going.

As you can see, it's doing fairly well!
 This is my lettuce.  My lettuce was doing great, until the day after this photo when it was shriveled and brown.  It has revived itself however, and is now doing well.  I think it's bi-polar.
 While not as prolific, this mix of lettuce will still make a great salad!
The onions are doing great, I just need to thin them a bit!
 Then there's the beans.  Does anyone need any?  I've given them out to all my immediate neighbors, plus I still have a ton left.  Perhaps next year 4-6 plants will suffice...


The tomatoes were doing great, until the deer decided to snack on them.  
If anyone would like to hunt in my backyard I'm good with that...