Monday, January 31, 2011

How To: A Simple Square Pillow

Project: A square pillow, with hidden zipper and piping
Time: For me, about an hour. For beginners, plan on three. I've made 3-5 dozen pillows over the last 10 years or so, I've got it down to a science.
Skill Level: A little sewing experience helps

When I showed my mom the bedding that I picked out for Mistress Monstress, she spoke the most terrifying sentences I have ever heard;

"I have the perfect piece of cross stitch to go with that! I made it for you when you were a little girl and never made it into the pillow it was supposed to be!"

Immediately, thoughts of country geese and hearts sprung to mind in those wonderful early 1980's colors of blue and mauve and I broke out into a cold sweat thinking of how to tactfully turn her down without hurting her feelings. So you can imagine my delighted surprise when she pulled out this:
and I realized that she was right, it was perfect for her room! When I picked up the bed skirt and other things from Craig's List the other day, included was a pink gingham pillow sham that matched the bed skirt. Since I already had a pillow sham to match the comforter, I didn't really need a second one, so I decided that it would be perfect for the back of the cross stitch that my mom had finished. I pulled out a zipper that I had in my drawer, and set to work creating something for Mistress Monstress using only things I already had. The outer part of the pillow was no problem, but I didn't have a pillow form. Or did I? Remember that loveseat I got off CL? It came with two other throw pillows in, um, less than stellar condition.
I used my trusty little seam ripper and got to work! It was a little bigger than I needed, but being a cheapy pillow, I just cut the batting mass down to the size I needed.
Now, to begin I ironed the pillow sham and cut it down the seam to make a single layer.
Using a straight ruler, I trimmed the fabric to make the sides square. To calculate how big the piece should be just use this easy math: Add one inch to the finished width of the pillow and 2.5 inches to the finished length. This was a 12" pillow, so my back was cut 13" wide and 14.5" long.
Cut straight across the width of the pillow about five inches down from the top of the pillow.
After the cut is made...
Put right sides together and pin the edge. Set aside.
I almost always do piping on my pillows. You can buy piping ready made, but it's really easy to make. Cut strips on a 45 degree angle off a straight edge of the fabric that are 1.5 inches wide. Cut enough strips to go around your pillow sides with a little left over.
Put your strips end to end, and then fold them back to make a seam. When you do this it will make two little 'v' shapes, stitch from the top to the bottom of those v's. Confused? Me too. Check out the next picture.
You know how they say a picture is worth a thousand words?
After all your piping strips are sewn together iron the seams open and get ready to insert the cording.
I get piping cord from Home Sew, $7.85 for 50 yards. It lasts a long time but it's way cheaper to do it that way. Well for me anyway, but then again I make a ridiculous number of throw pillows. Anyway, put the piping cord in the center of your piping fabric strips and fold it over.
I use a piping foot, (#12 on my Bernina) to do this, just move your needle position over all the way to the right and stitch the entire length, folding as you go. I also use the auto-needle down feature, which in my opinion is worth it's weight in gold.
Once you have the piping done, now you stitch it onto the front of the pillow. I already had this one made up, but if you don't just cut your fabric an inch larger on all four sides than the finished size of the pillow. This one is a 12 inch pillow, so the fabric would have been cut 13" square. Line the edge of the piping up with the edge of the pillow front. Start a little past the end of the piping, and I always start at the bottom of the pillow.
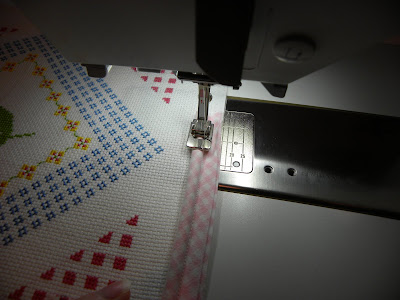
Snip your corners to make turning easier.
When you get back around, cut your piping off so that it overlaps about an inch or so from the other end.
Using a seam ripper, open up your piping back past the starting point.
Cut the cord only so that the two ends meet when they lay flat.
Fold the fabric under to create a finished look, and line everything up. Then stitch in place.
The finished piping.
Now onto the back. Baste your two pieces together 3/4" from the edge.
Now, just next to the basting stitch sew a seam 1.5 inches from both edges. Backstitch for security.
Take the back to the ironing board. fold down the seam and press flat. This is also a good picture of the basting stitch next to the 1.5 inch seam.
Pressed flat.
Now fold the top seam backwards so that approximately 1/4 inch of the fabric extends past your basted line. Press in place.
A little hard to see, but hopefully you get the idea.
Attach your zipper foot and use it to stitch your zipper on to the 1/4 inch fold that is sticking up.
Once the zipper is attached, then fold the pillow back open and stitch the remaining three sides of the zipper, starting from the first line of stitching on the zipper. Pull your threads through and tie them off in the back.
Here's hoping this picture helps a little...
Once your zipper is secured, then you need to remove the basting stitch. It's hidden under the flap on the back.
A better shot of where to find the basting stitch.
When the basting stitch is gone, flip the pillow back over and you have a hidden zipper with a flap!
Now lay your pillow front face up on a flat surface. Lay the back on top right side down. Line up the edges and pin around the edge to keep it in place.
Pinned and ready to go!
Stitch around the edge using your piping foot. it will guide your stitching and make sure you keep on track. Start at the middle bottom. Once you have rounded your last corner, stick your hand inside the pillow and unzip the zipper so you can turn it right side out when you are done. Finish stitching and turn right side out!
Ta-Da!
And here's the finished product. It's a little scary how close my mom came to bedding that I wouldn't choose for nearly 30 years. Cue the theme from the Twilight Zone...

More Decorating on a Dime

This past weekend was a beautiful weekend here in the South, so I took the opportunity to get outside and do a project that really needed to be done. Our daughter has gotten way too big for her crib, so I needed to refinish the bed that I got her on Craig's List before we moved. When I bought it, I remember thinking how it was just going to sit around for a long time since she was still so little. I'm still not sure where the time went, but here she is almost two and a half and ready to move up in her little life! After two boys, I really wanted to go all out girly in her room so when we moved here she got light pink walls and a bedspread from Pottery Barn Kids that hung out in the closet. (The bedspread was a major splurge, but I really loved it!) After that I wanted to really watch what we spent in her room.

First off, the bed. I got it on Craig's List before we moved for $75. It is solid wood from Bassett furniture, and really good quality. Unfortunately they had painted it a bright white and it didn't match everything else in the room. I painted it and distressed it to match the rest of her furniture and she has a great bed that should last a long time. I found the Pottery Barn Kids bedskirt with a set of PBK sheets, matching pillow sham, (that will be used in a future post) and a mattress pad for $30 on CL. Not too bad considering that brand new I would have paid $30 for just the sham! I also refinished the nightstand, (which started off painted black) also from CL for $35.
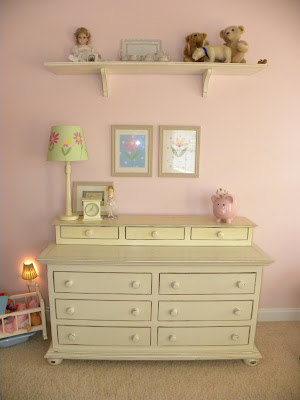
The dresser was the inspiration for the rest of the furniture. It also came from CL. I loved the style, I loved the distressed look, and it worked perfectly in her room! The lamp came from PBK, we had a coupon for $15 off a purchase of $30 or more and the lamp base was on clearance so I got both pieces for around $20. The shelf is held up on brackets that were from my parents' first apartment! I can't believe they held onto them for that long, but it worked out for me! I just painted and distressed them with a scrap of wood for the shelf part and had a cute little shelf for her room.
These two prints and the two above the dresser were a great find. Ebay has lots of people who make prints to coordinate with kids bedding from well known companies, and I was able to get all four prints for around $15. I got four frames from Michael's for $5 apiece when they were on sale and had artwork that looked a lot more expensive than it actually was.
This little table and the tiny chest of drawers pictured below are probably one of my favorite possessions. My great great grandfather made these for my grandmother during the great depression. They were stored in a barn for decades until I got them. I had them refinished and found these two little chairs at Ikea to coordinate, and my daughter spends hours having tea parties with her dollies. The tea set was another CL purchase!
The little dresser. It comes in very handy to store doll clothes!
This room really came together for me and I love the end result. I love even more that I spent less than the cost of just a bed frame from PBK on the entire room. More importantly, Mistress Monstress loves the end result and squealed with delight at her 'big girwl bed.' Hopefully she'll stay put in bed tonight!

Thursday, January 27, 2011

Homemade Salt Scrub

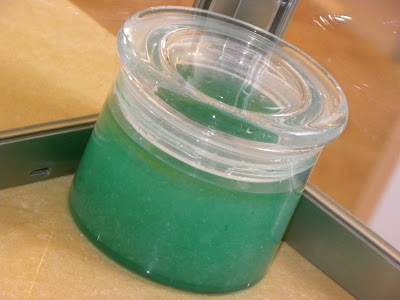
Today I have my first guest post! My sister in law, Shelly is married to my youngest brother and made everyone some amazing salt scrub for Christmas. I asked her if she would like to do a guest post, and here it is! This makes a great gift and as soon as mine is gone I'll definitely be making some more!

Difficulty - seriously - most kids could handle this one!!!!
Time - like 5 minutes if you have all the supplies on hand

Ingredients:
2 cups Epsom salts or organic cane sugar (I used the Epsom salt because that was what I found at the store first)
1 cup carrier oil (I used Safflower oil which is used in cosmetics and is a good substitute for Sunflower oil)
8 drops essential oils (I have used lavender, spearmint, peppermint, and eucalyptus - each have their own "healing" powers)
1 drop food coloring (I have Neon colors so I was able to get purple. Also, I used 3 drops to make it a darker color that I liked better)

The essential oils that I used had a dropper end, but if what you are using does not, you'll want to use a plastic pipette. If you can find them sold in small quantities, let me know. If not, I bought a thing of 500 and ended up not really using any. So if you can't find any - let me know and I'll get a bunch to Ashli and she can hand them out, cause I am SURE I will never use 500!!! Finally, a canning jar is great to store the scrub in. For Christmas I used more decorative jars but they tend to leak. I have all my leftovers stored in mini canning jars.

First, combine the salts and the carrier oil, mixing well. Then add the essential oil, one drop at a time. This part, sadly, after making more than one or two batches, I was so overwhelmed with scents that I just used the 8 drops mentioned in the recipe. I felt they smelled really strong but in smaller doses I don't think they were as strong as I thought when I was making them. Finally, add the food coloring. Stir until it is well blended. Like I mentioned above, I added more food coloring based on the color that I liked the best. Just make sure to blend it all the way through the mixture or what ends up in the canning jars may vary in shades (and scents for that matter).

Lastly, spoon the mixtures into a canning jar. I would suggest following normal canning sterilization recipes to ensure that the jars are really clean before you give it away - but for mine I just hand washed them in normal hot, soapy water. I mean, we would eat off the things I wash that way - so this can't be bad.

It was really easy, rather inexpensive (after the essential oils), and people seem to like them.

Enjoy!
Shelly

I'm Linking This To:

Wednesday, January 26, 2011

Decorating Without Busting the Budget

I've said it before and I'll say it again; I love Craig's List. It has to be one of the best websites. Ever. Well over half of our house has been furnished from the site and even though it usually involves a lot more time and effort than opening up the Pottery Barn catalogue and pointing to a page, you can get some amazing deals on quality furniture for a fraction of the price of purchasing it new. You'll still have to spend more for higher quality, but still end up saving a large chunk of change. I look at it this way, you can get Pottery Barn or Crate and Barrel quality at Walmart Prices.
For the last several weeks I have been working to complete a room makeover on our loft area. (Technically I'm not sure that you could really call it a makeover since it was previously an empty, unused space, but nonetheless I have been working on finishing it for a while now and am really happy with the progress.) It isn't finished, I still plan on some wall art and a few more accessories, but I felt it was finally finished enough to publish and give you a few tips on how to make the most of your money in home decorating.

Before:
(I guess I probably should have taken a before picture, huh? You'll have to use your imagination here, think bare wood floors, bare walls, and no furniture. Like I said, empty. Echoes. Crickets chirping. You get the idea.)

The Pieces, and How We Were Able to Save:

I suppose I should start by telling you that the mini sofa I liked for the loft was priced at $1000. Ha. Right. I'll keep dreaming.

The rug came directly from Pottery Barn. We had several gift certificates and store credits, a 20% off purchase coupon, and some Christmas money. It was also on clearance. The rug pad came from Home Depot and was purchased with another gift certificate that we also received for Christmas.
The Leather Chair. Originally from Crate and Barrel, we received it as a gift about 8 years ago. It is comfy, cozy, and was WAY too big for dear husband's office in this house, so we relocated it to the loft. Cost? Nada.
The Sideboard. I got this off of Craig's List right after we moved here for $200. Solid wood, hand distressed, and HEAVY. Seriously, you should have seen me getting that thing up the steps with Ian. It's a miracle nothing was broken. Original retail price for this piece was a little over $1200.
Lamp from Lowes. Right after we moved here we got suckered into an in home sales pitch for a water softener. (I'm still a little salty about those two hours I'll never get back. And no, we did not get the water softener.) On the plus side we did get a gift certificate to Lowes for listening to said pitch, so we got a free lamp! We later purchased a second matching one with another gift certificate.
The Loveseat. I spent a lot of time looking for a loveseat, I wasn't all that jazzed about buying a used one but the cheapest new one I could find (that was decent quality) was around $600 plus $100 delivery. Not really in the budget right now. I did find this one on Craig's List, $150, good shape, clean, and neutral. It works! Even if I had gone with a cheap one from Target or Walmart, I would have spent over $300 and it didn't look as good as this one.
The End Table. My brother built it when my husband and I were first married, it was stashed in the corner of my sewing room and not being used to it's full potential. I bought a new drawer pull for $2 on clearance at Lowes to coordinate with the sideboard, changed it out, and had a quick, updated look for our table!
Now onto the throw pillows. I found this fabric when we moved here and LOVED it. My mom got me 3/4 of a yard as a gift, and I tucked it away knowing that I wanted to make throw pillows for someplace in our house. I also dug through my stash and found some cream colored silk dupioni that was supposed to be a Christmas tree skirt when I bought it nine or so years ago. It was a good match, and so it became piping and the back. I also had zippers in my stash, so the pillows didn't cost a dime out of pocket.
These throw pillows came with the loveseat that we bought, and although I didn't mind the cover I didn't love them with the rest of the stuff in the loft. So I used the forms inside (which were down filled and very nice!) and recovered them with the fabric shown above.
And here's the finished pillow! I love the way they turned out, I made two for the loveseat and they lighten up the space. In the future I have at least one more pillow planned, but this was enough for today!
The Result... (the loveseat is not stained, the camera flash did weird things to it!)
One end of the loft...
...and the other! (Like I said though, still need some artwork.)
Overall I am thrilled with how it turned out, this is a great place to sit and read to the kids at night and even though it took seven months of getting a little at a time we were still able to finish it for a third of the cost of the sofa I liked originally. So if you have a room that needs an update or is out of your reach, think outside the box to redecorate instead of reaching for your credit card. Pull from other places in your house or attic, check Craig's List, garage sales, or secondhand stores, grab some fabric from your stash or the bargain bins, find a fun craft online, and check the clearance aisle at your favorite store. Or, if you're really desperate, agree to listen to a pitch for water softeners to get a new lamp from Lowes.