Showing posts with label No Sewing Needed. Show all posts

Thursday, March 14, 2013

A Quick Hat Rack for an Army Room!

After making over the Professor's room for his birthday, I had one piece of board leftover from the shelves that I didn't want to go to waste.  The professor has a TON of hats in his collection and they didn't have a home, so I decided that the best use for the last board was to make him a hat rack!  Even if you include the cost of the board ($5ish) all I needed was 2 packages of hooks ($3 each) the same container of free sample paint, a stencil for the lettering ($2) and a black sharpie marker.  I cut the board down a tiny bit, freehanded with the stencil, attached the brackets, and added two hanging brackets on the back (that I saved from some artwork we bought so they too were free) and we had a hat rack that was LITERALLY the hit of the room.
 I hung it below the shelving above his bed and he's good to go!
One hat rack for about $10.  A great way to use up leftovers and make a 9 year old VERY happy!

Sunday, January 27, 2013

A Birthday Boy Room Re-Do

The Professor is going to be having a birthday in the near future, and being a very grown up boy of nearly nine means that he wanted a more grown up room.  So for his birthday, he asked to have his room re-done in a military theme.  I was on board with this because I knew we could do it for a reasonable amount of money and without an insane amount of work.  These are all from my cell phone, so excuse the quality of the photography, but you'll get the idea!

Before:  Light blue walls, a group of star wars posters and a madras quilt bedding from Pottery Barn Kids.  Not a bad look, but definitely not military. 
After:  We painted the walls an army green color, (a compromise from the cammo walls that he wanted...) purchased a new quilt and sham from Pottery Barn Kids (using a bunch of rewards points so really negligible cost to us) and changed out the lamp shades. I also purchased six shelf brackets at $5 apiece from Lowes and two six foot pine boards at $8 each.  I had them cut in half at Lowes and painted them with a free sample of brown paint I had lying around.  Total cost for the shelves, $46, but I also had a half board left over.  (Project to come soon!)  They were then decorated with military themed items that he already owned.
Before:  More green and blue, cool car painting, and an absolute mess.  (To be fair, that probably won't change much!  He is, after all, a boy)

After: New lampshade and really cool artwork.  I got the poster online for about $15 and the frame at Hobby Lobby with a 40% off coupon.  I also got a tin ammo box at HL and filled it with all the small trinkets lying around on his dresser.

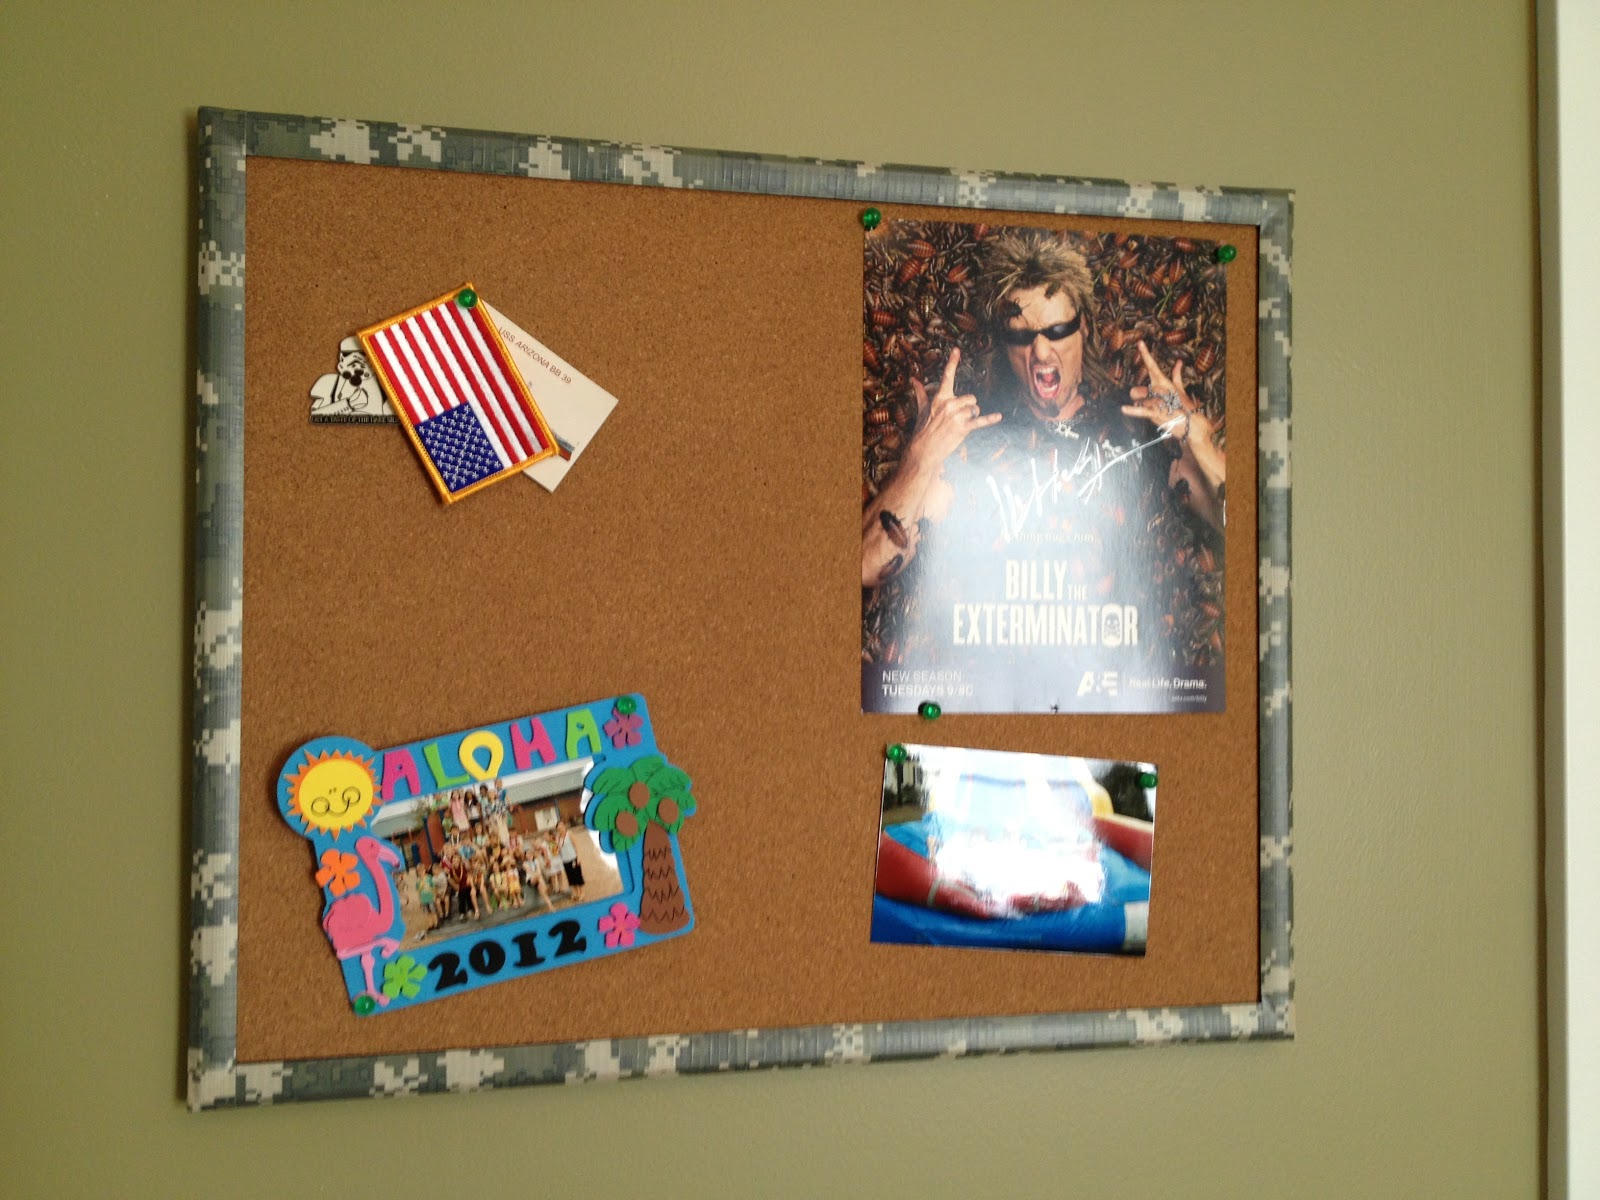
 And finally, I took his plain black bulletin board and covered the frame with cammo duct tape!  Super easy and only took me about 5 minutes.

 And there you have it!  While I still have one more military themed project up my sleeve for the near future, this was a quick room re-do that should last him well into his teens.  At least, that's the plan...


Thursday, September 20, 2012

Good Clean Fun

To begin with, (speaking from experience) this is a great project to do BEFORE you have cleaned your bathroom and NOT after.  'Kay?  

This little activity is nothing new, but it was something that I discovered had unintended but beneficial side effects.  My kids LOVE to play with baking soda and vinegar.  They love watching it bubble up and fizz and I love that their "experimenting" is completely safe.  I used to give them the baking soda to play with on a cookie sheet but quickly discovered that it didn't stay there, so in a stroke of genius I decided one day to pull the drain on the sink in the bathroom, fill it with baking soda, and let them play in there.  When I was finished I would just wash it all down the drain and be done, no huge messy clean up needed!
 What I discovered was that after this play time not only were my sinks clean, but also they drained a lot better!  I knew that baking soda and vinegar were good for cleaning and I knew that you could use them to clear a drain, but I didn't know that kids' fun could result in something being cleaner at the end than it was in the beginning.  Score one for Mommy!
 So now whenever I have a slow drain I dump some baking soda, pour some vinegar, and let the kids have at it.  But they don't know that they are cleaning so shhhh....

Friday, July 6, 2012

Another Refinishing Project!

I have decided that in addition to being frugal, I am also a glutton for punishment.  How else could you possibly describe someone who decides to refinish a dresser in the garage, in the middle of summer in South Carolina?  Anyway, I found this dresser on a local classifieds page for $30 and couldn't NOT get it for our guest room.  While it was definitely an older piece in need of some TLC, it was also solid wood, a good size, and had ample storage for our guest room.  And did I mention that it was $30?  Plus it was right up the street.  Bonus!

Here it is, in all it's pre-refinish glory.  Ugly old knobs, water marks on the top, and just kind of sad looking.  (Go ahead, be impressed that I remembered a 'before' photo.)
 Here I am mid-project.  It was at this point I was cursing the whole process and wondering why I didn't just go to Ikea...
 And then, after a coat of primer, two coats of paint, fresh stain on the top, and some new knobs, I was thrilled with the outcome.  I'm loving the way it turned out, and I finished in time for some of our besties to come for a visit!  In total, besides the $30 for the dresser itself, I spent $25 on new knobs and about $20 on paint, stain, and polyurethane for a grand total of $75.  Not bad for a brand new dresser!
And now you see why I've been MIA for a while.
Well, that and I was at the beach.  ;)

Saturday, May 26, 2012

Wine Cork Garden Markers

I like wine and I have a problem throwing away wine corks.  I'm not sure why, but I just can't seem to pitch them in the trash can after opening a bottle.  In my dining room I have three large vases, one with red wine corks, one with white, and one with champagne corks.  My jars have gotten full so now I have a large bag full of them up in my craft room.  I keep finding all these cool cork projects on Pinterest and since I have a plethora of corks I decided to try a few of them out.  Today, I made some markers for my garden using a few!

Super simple, and they didn't take more than a few minutes.  I used wooden skewers that I have been collecting out of my kids' Earth Fare meals for the last few weeks (Kids eat free every Thursday, up to SIX kids meals with a $5 adult purchase.  Love.) and the old corks that I have, (free, and free) and wrote the names of everything that I am growing this year and in less than five minutes had some really cute markers for my veggies!
 I can almost taste the zucchini bread now...
 I love these little onion sprouts, can't wait to use them in a stir fry or salad!
 LOVE my garden, and love that I can grow organic veggies so easily.  There's something great about heading out into my backyard to pick dinner!  I would have chickens if I could, but our HOA frowns on them...
In a couple of months this lettuce will make a great salad for dinner!  Yum!

Monday, May 21, 2012

A Crayon Container

I love it when a normally throw away type of thing inspires me!  A while ago I made this juice and realized that the container that was left would be perfect for something, I just wasn't sure what.  So I tossed it in my "figure out a use for it" basket and let it sit for a little while.  A few days ago I realized exactly what I was going to use it for...a travel crayon container!  Not only would it keep the crayons from getting crunched in a bag, but it also fits conveniently in a car seat cup holder.  Since we do a lot of traveling in the summer, I knew that it would definitely come in handy!

I started off measuring the size of the container and cutting a piece of scrapbook paper that I had in my stash to fit.  Then I mod podged it in place.  I also added some cutouts from a coordinating piece of paper and a circle for the lid.  Modpodge over the whole thing and we had a crayon container!
 Voila!  One finished container.  And again, the best part was that it was totally free!  I had all the supplies on hand already and the juice was even free.  I bought it with a coupon!
 Super simple and free.  Doesn't get much better!


Thursday, May 17, 2012

Something Out of Nothing

A while ago I got a magnet with some razor blades that I bought.  It was a nice magnet in terms of durability, magnetic hold, and size, but it wasn't exactly a magnet that I really wanted to display.  So, I got out my paper crafting supplies and got busy, and in less than 10 minutes had transformed it into a cute little magnet that I'm happy to have on my fridge!


I started with some simple supplies that I had on hand.  Since my kitchen has a lot of red and brown I picked these papers and card stocks.  I also pulled a couple of punches, a stamp, and a little clip embellishment.
 I started off by using mod podge to put the paper on and cut it down to fit the magnet after I had glued it on.  Then I sanded the edges and distressed with a little brown ink.
 
 Next I used my 'happiness' stamp and the punches and made this little oval tag.  I used the brown ink to distress the edges.
 Then I mod podged both pieces and let them dry.
 Finally I added some little dimensional foam stickies to the back of the oval to make it pop off the magnet a bit, clipped on the little clip, and had myself a little magnet!  And the best part is that it was FREE!!!  I love making things for the house, but the 'free' part makes it that much better!


Sunday, January 22, 2012

Growth Chart

A while back I found a really cute growth chart at my favorite store, Pottery Barn. It was 6 feet long and shaped like a ruler and was perfect for our home. Unfortunately I just couldn't get past the price tag. I don't remember exactly, but I think it was between $80-$99. Ouch. So, when we had the laundry room painted and our painter covered over the kids' height marks, I decided it was time to finally get around making one for our house! I didn't take step by step photos, but the process was the same as our family name plaque. (Only on a much bigger scale!) The only thing you need to remember is to see how high your base molding is, then add an inch or so and start your growth chart at that point. Our base molding was 4 1/2 inches, so I added a 1/2 inch and started the bottom at inch number 5. That way you can hang it high enough to clear the molding and none of your foot markers are at the top or bottom of the chart.
Check out the results!


And the best part? Mine only cost $6 for the piece of wood. Everything else I already had on hand. The paint was leftover from one of our bathrooms, the tissue was ironed out from a Christmas gift, (yes, you really can iron tissue paper. Lowest heat possible and no steam, works great!) and the inks, modpodge, and marker were all things I already had in my stash. I even had the hanging bracket for the back! I made sure to record all the kids' heights from the laundry room before our painter covered them over, so I'll add them back in and we'll have a family keepsake that will be around for decades to come. Lord willing, our grandkids will be on there someday!

Tuesday, January 10, 2012

Closet Organization

Happy New Year!!! I may be a little late, but I have a good excuse; I have been systematically organizing each and every room in our house. Every cupboard, drawer, closet, nook, and cranny in the entire house. It's taken me a while, but Goodwill has gotten a ton of stuff out of my way, the trash man hates me, and finally I see a light at the end of the tunnel. I love organizing. Seriously. I'm one of those crazy people who gets as excited about a trip to the container store as a child gets going to Disneyland. I love the feeling of accomplishment when I finish cleaning something and it's all neat and tidy, which is probably why I banned my kids from their rooms today. I wanted them to stay clean for a day. Kidding. Anyway, one of the areas of our house that was bugging me was the kids' closets. They are nice and large and have tons of space, but were completely poorly designed with a standard wire shelf across the top and nothing else.

See all the wasted space?
And do you see WHY we needed more storage space in the closets?
So I went to one of my favorite stores, Ikea, and bought each boy one of these bookcases for their closet. I liked them because they were really sturdy and durable and offered plenty of space for all those toys that were laying around the room. I used four bins for each kiddo that were given to us by a neighbor and organized the smaller things into them while keeping the top cubbies for larger toys. The best part is that I can rearrange as needed as they continue to grow. They could also be combined someday to make a larger wall unit. Very versatile!
And now I can breathe easy, knowing that my boys will be organized. For at least an hour...

Saturday, December 24, 2011

The Eleventh Day of Christmas Crafts: A Glitter Ornament


This was so simple to do, and I love the way that it turned out. I found this idea on pinterest here and decided that it would be a great ornament to add to a bottle of wine for our neighbors. I used music clip art instead of a book page and in about 15 minutes created this little add on to add a personal touch to a simple gift.

The Tenth Day of Christmas Crafts: A Framed Quote

I love this quote and just had to have it in my house somewhere! I printed it out on my computer on card stock, distressed the edges, matted it, and framed it in an old frame that I did a really quick paint and distress job on. I can change the quote any time I want to and I think it adds a bit of whimsy to the house!

Thursday, December 22, 2011

The Ninth Day of Christmas Crafts: A Simple Knotted Blanket

Every year, I like to make my kiddos each at least one present. This year I decided that they each needed a special blanket from Mommy, so I set out to buy each one a fleece print that matched their interests and personality. Mistress got a pink and purple Rapunzel blanket, The Professor (who is ALL boy) got an army green and camouflage print, and Buggy got a Scooby Doo print backed in yellow. These blankets are super easy, (albeit time consuming, so I'm glad I only have to do three!)

First, I got two yards each of two fleeces. One of the print, and one solid coordinating color. This particular blanket is Buggy's. (His favorite color is yellow.) Trim the selvage off the edges and straighten the cut ends. Then lay the whole thing out so you can work without moving it. Also, pay no attention to the messy sewing room, 'kay?
I LOVE this fringe ruler, it makes the whole process so much easier. I don't remember how much I paid for it, but you can get them at places like JoAnn's. Just line up the edge of the fabric with the length of the fringe you want to cut. I do 3 inches.

When you get to the corners, cut out an equal amount to the fringe length that you are doing. In this case, I cut a 3 inch square out of each corner.
Then start tying your fringe in knots. I would suggest some music at this point, it helps the process move along. Make sure that you don't get the fringe mixed up or you may miss one. That's why I suggest laying the whole thing out and not moving it. Also, the sides will stretch when you tie them. I haven't figured out a way around this...
By removing the corner you get a nice finished look. I would suggest music.
And in about an hour you have a nice finished cozy blanket. Here's hoping that my kiddos will love their presents!