There's nothing in the world like the smell of a freshly washed baby. For me it rates right up there with a spring rain, an apple orchard in the fall, or a fresh cut Christmas tree. They come out of the water all wrinkly and pruny, smelling like baby powder, their soft baby skin just begging for a kiss and a cuddle. A baby shower wouldn't be complete without at least a half dozen of those little hooded baby towels for the mom-to-be, but unfortunately we learn all too quickly that they only work for a couple of months before baby is too big to fit in them! When my daughter was born, I had a friend who gave me a handmade towel like the one I'm going to show you how to make. It was by far the best towel I ever got for my kids, and it still fits my children today, even my oldest who is almost seven!
Project: Ribbon Embellished Baby Towel
Time: 60-90 Minutes
Skill Level: Easy Peasy!
To begin, you will need one bath towel, one hand towel the same color as the bath towel, (this can make two baby towels though as you only use half of it) and ribbon that coordinates with your towels.

Start by cutting two lengths of ribbon approximately 1-
2 inches longer than the width of your towel.

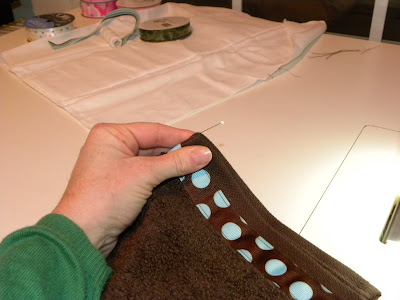
Similar to the burp cloths, fold the edge of the ribbon under and begin to stitch as close to the edge of the ribbon as possible. Personally, I like to start the ribbon after the border edge on the towel. You can see the edge better in the next picture.

You can see the edge here that I was talking about. When you get to the end fold the ribbon edge under and stitch to the end of the ribbon.

Turn the corner...

...turn it again, and then stitch up the other side. You will need to go a little slower, the towel loops tend to fold over the ribbon and for the neatest appearance you will need to make sure they are out of the way. When you get back to the top, turn the corners again and end your stitching where the you began. Tie off you threads and weave them in. If you need a tutorial, go to my Jeans...Transformed post for a step by step.

On the other side, either cut off the label or pin it back so it doesn't get stitched into the ribbon. Attach the second length of ribbon the same way as the first.

Set the bath towel aside.

Next take your hand towel and lay it out. Measure to the center and cut it in half exactly.

Set one half aside, you'll be able to make a second towel hood out of this later.
I like to remove all the tags for the hood part. Cut it off carefully so as not to cut the towel.

Fold it in half so the raw edges of the towel are pinned together.

Stitch the length of the raw edge using a one inch seam allowance.

Here's the kind of tricky part. Pin your seam allowance open and stitch up as far as you can go toward the point. Don't worry that you can't get all the way to the end, you'll be getting rid of the point anyway. Just make sure you don't catch anything in your seam that isn't supposed to be there!


Both sides are stitched as far as you can go, now it's time to get rid of that point!

Lay it out as shown here on a cutting table.

Using a straight edge, get rid of the point. I like to measure down approximately 1.5-2 inches. Just make sure your stitching extends past where you cut!

Cut the point off. Stitch your seam closed using approximately a 1/2 seam allowance.

Cut a length of ribbon and attach it to the bottom of the hand towel using the same technique as the sides. Make sure you sew it to the finished side of the towel, not the inside!

Now find the center of the hood and the bath towel.
Match your centers up...

And pin the hood to the towel. You will have the edge of the towel overlapping the finished edge of the hood, right next to where you stitched the ribbon on.

Carefully attach the hood to the towel.

Cut off any stray threads and you've got an adorable little towel that mom and baby will both love!
My oldest, modeling. The bigger the towel, the bigger the kid it will fit!


did britt peterson make this for you? we still have ours she made too!
ReplyDeleteYeah, she inspired this one, we still use the one she made for us all the time!
ReplyDeleteSuper cute! Love the brown and aqua!
ReplyDeleteThanks for sharing I can't wait to make one for each of my 3 kiddos. I have some really cute appliques that I'm going to put on them. I think I might monogram their names on each towel. I will definitely be following your blog for more cute ideas.
ReplyDeletewhat a cute project!
ReplyDeletethanks for sharing and linking up at our crafty saturday party! can't wait to see what you have in store this week!
http://tosewwithlove.blogspot.com
I absolutely love this! What a wonderful baby shower present!
ReplyDeleteToo cute!
ReplyDelete