Tuesday, November 13, 2012

Simple Curtain Toppers

One of the things I love about our house is that the entire back is covered in windows.  We don't back up to another home, so we have a gorgeous unobstructed view of the backyard.  I wasn't interested in blocking the view but I did want to add a pop of color and soften the windows, so I decided to make some really simple toppers.  I started with this great cranberry colored decorator fabric that I found on clearance at Hobby Lobby for $7 a yard.  (LOVE clearance!)  I purchased 4 yards and still have some left over so in total I have about $30 into these toppers.  I also bought a coordinating taupe color that matched the paint color for the bands to hold them up.  My intent is to do a reverse for the window over the kitchen since the walls there are an accent red color.  I got them all stitched together and then stapled them to boards to mount above the windows.  Anyway, here they are:


 A photographer I am not...
 And another shot at night so you can see the color better...
In total, I have about $45 into this project, but there are 7 windows and I can probably get a pillow out of the leftovers.  Not bad price wise, and I love the extra color and softness they bring to the windows.  I should have guests more often, they spur me on to get projects finished!

Monday, November 12, 2012

A New Butler's Pantry!

I would be willing to bet that anyone who has ever built a house has at some point in time wished that they had done a few things differently.  I can honestly say that for the most part we have been very happy with all the choices we made, except for one.  

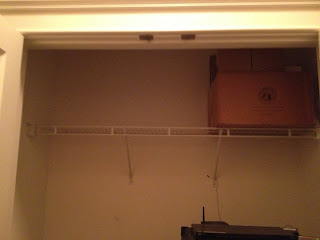
Everyone, meet our worthless closet: 
 Located across from the actual pantry, this closet was completely redundant and unused in the two and a half years that we have lived here.  The builder did put in one underwhelming wire shelf, but other than some empty cardboard boxes that I save for shipping, our stereo, and the broom, this closet was empty.  Empty and waiting for something better out of life...
 One of the options that we had when building was to make this area a butler's pantry.  We liked the idea at the time but really wanted to keep our final budget from getting higher than we had agreed on, so we had to pick and choose what mattered most to us.
But after a couple of years of saving we were ready to do what we originally wanted to this area.  Now I am a big do-it-yourselfer, but the most important rule to remember when doing something yourself is to know your limits.  This folks, was WAY beyond my skill level!  So, we called in a few experts and began the process.  :)  First up, the cabinet dude.  (No really, he calls himself Bruce the Cabinet Dude...)  He made this great sketch that we ultimately picked for our final design...
 ...and then we got the demo guys involved!  Here it is all cleared out up to the ceiling, patched and awaiting paint. 
 Next came the paint and then we waited for several weeks for the cabinets to come in.
 FINALLY the cabinets arrived and they began to go up!
 See this massive wad of wires?  This part sucked.  
(FYI, an HDMI cable is VERY fragile.  It is also expensive to replace.  Go ahead, ask me how I know...)

 Finally all the cabinets were back in, the stereo was hooked back up, and the wiring for the under cabinet lighting was complete. 
 Then we got granite that matched our kitchen, and a remnant at that.  BONUS!!!
 And then got the tile in for the backsplash to match the kitchen.  It ended up being a bit lighter than the tile in the kitchen since two years have passed, but I don't notice a big difference.
 And here it is from the same angle as the closet.  We LOVE the result and have so much more usable storage now.  The end result was worth every penny!