Showing posts with label Fixing Fashion. Show all posts

Monday, March 28, 2011

When Life Hands You Lemons...

Make them into a shirt.

Ha. No, really.

I'm not someone who makes a lot of clothing. I alter already made stuff, I mend and patch, but following a pattern and making something from scratch? I can count on one hand the number of garments I have made from scratch. I've decided though, that it's high time I dove in and tried some out. After all, the remnant bin at Hancock Fabrics often has pieces big enough for a sundress for Mistress Monstress that can be purchased for a really reasonable price! So, I dove in. MM picked out a piece of green seersucker with embroidered strawberries, and I picked a pattern for a little pillowcase style dress. From start to finish, it was a very simple project.

Except for the little issues I ran into...

First, I mistakenly traced the wrong line on the pattern and therefore cut the front and back pieces about 3 inches shorter than they were supposed to be. Second, I made her the size three, assuming that it would fit perfectly. I forgot to take into account the fact that her height is in the 90th percentile for her age.

So, long story short, her dress turned into a shirt. Being that it's in the 30s in SC right now and she absolutely had to wear it immediately, we added a long sleeved white shirt under it and a pair of jeans. Even though I didn't start out to make a shirt, I still love the end look and more importantly, so does the Mistress!

Saturday, March 5, 2011

Fixing a Favorite

I would be willing to bet that if I polled 100 individual parents of children under age five right now, 98 of them would tell me that their child owns a favorite article of clothing. You know it's a favorite because they beg to wear it when it's dirty, (if you were able to get it off of them to begin with) and it's never known the inside of a drawer because as soon as it comes out of the dryer the child wears it again. In our family my middle son has a favorite pair of socks. He got the blue hospital issue socks when he had his tonsils out a couple of years ago and he wears them as much as possible. My oldest son, (being past the age of five and way too mature for such silliness) doesn't have anything that would qualify as a favorite, but our daughter has an outfit that falls into the category with flourish.

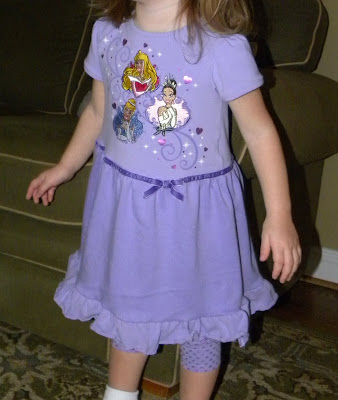
Mistress Monstress 'frow-uped' all over herself at the happiest place on earth. That's right, at the end of the firework spectacular by Cinderella's Castle in the middle of a huge crowd of people, she brought out her dinner for all to see. And, she thoughtfully did it all over her clothes. Being November and night time, we needed another outfit and since I (mistakenly) thought we were past the age of extra clothes and didn't have anything with us. So, my husband ran to get her something new and overpriced to wear while I dashed to the bathroom to clean her up the best I could with nothing but wipes. The resulting outfit was one that quickly became a favorite and was worn as much as possible for the entire winter. It was an appropriate choice for a two year old girl's favorite because it met a multitude of girly criteria:

1. It was purple.
2. It had ruffles. Lots and lots of ruffles.
3. It had shiny purple hearts on the leggings, and most importantly...
4. It incorporated not one, not two, but three of the Disney Princesses on one shirt front.

Unfortunately, as winter draws to a close, the most important of Mommy criteria was no longer being met; it was getting way too small. The sleeves missed her wrists by a good inch, the leggings missed her ankles by several inches, and the ruffly shirt that was meant to go past her little diaper butt no longer met it's mark. In short (sorry, couldn't resist) it needed to go to the goodwill pile. Or did it? Figuring I had nothing to lose I decided to see what I could do to extend the life of Mistress Monstress's favorite princess outfit. This is something that could be done for any little girl to just about any shirt too!

The original shirt. Adorable, I know, but too small! I kept the leggings as is, since short leggings just look like capris.
I started by painstakingly removing every bit of ruffle and trim from the bottom and saved them all for later. They do come in handy!
Next I took the sleeves from long to short. I measured up from the cuff instead of the shoulder, that way I got a better measurement and the right angle on the sleeve for the new cuff. Make sure to leave enough for a new hem!
The new top for a dress!
I was lucky enough to find purple knit that was nearly perfect to match the existing top. I cut a rectangle that was twice the distance around the bottom of the top of the shirt, did a gathering stitch along the edge, and pulled the thread to gather the edge. Make sure to divide the skirt into fourths before you gather.
Divide the top into four equal parts, and adjust your gathers to make the skirt fit. Pin all the way around and stitch in place. Remove gathering threads if necessary.
Next, I attached the purple ribbon back to the waist of the dress.
Remember those ruffles? I reattached them to the bottom of the dress.
All that was left was a new hem in the sleeves, I used a twin needle and hemmed them about 3/4 of an inch.
And here you go! By purchasing $3 worth of purple knit, I got another season out of Mistress Monstress's favorite outfit. She was SO excited and begged to put it on right away, so I'll call this one a success!

Saturday, January 22, 2011

Use What You Have!

We have all heard our grandparents say things like "Waste not, want not!" And "Make do with what you have!" It seems that all the expressions from the Great Depression are making a comeback during our recession with people cutting costs and saving. For the first time in a long time frugal is the 'in' thing which suits me just fine! I remembered my grandmother telling stories about how she took apart her wedding suit to make a coat for my mother when she was little, about how a trip to the secondhand store snagged her an overstuffed chair for $1, which was recovered several times throughout her life. Growing up she volunteered at a thrift store and would often times bring things home with her at the end of her shift, passing them out to the members of the family that they best suited. When I was in high school I didn't want to wear it if it didn't come from the Gap or Express, so I often turned up my nose (in private of course, I wouldn't have dreamed of hurting her feelings!) at the thought of wearing something secondhand. Now, as an adult with three children and bills to pay, I frequent places like Goodwill and sites like Craig's List, and find a thrill in the hunt for bargains. Half of our house was furnished from Craig's List, and I am a die hard coupon clipper. By stacking those coupons, I almost never pay for toiletries anymore and often have to have the manager at our grocery sign off on my total because I've saved too much. A good portion of my kids' clothing comes from secondhand stores and hand-me-downs from amazing neighbors and friends, and I will drive my car until it dies a complete death and can go no further. I could go on, but I think you get the idea...I am a frugal person with a thrifty gene deeply embedded in my DNA. Why throw something out if it can be repurposed? So I started with two shirts in my closet and decided to see what I could do with them.

Project: Reusing old clothing for a new purpose
Skill Level: Depends on what you are reusing it for!
Time: Varies, this project was several hours

So here they are, two shirts that haven't been worn in a long time. Both started out as clearance purchases, the blue one was $6 on clearance at Kohl's and the floral was $8 at JC Penney. The floral one shrunk when I washed it and the elastic in the sleeves made a ring on my arm every time I wore it which was VERY uncomfortable...
...and the blue one got a hole in it. I might have been able to fix it, but it really wasn't my favorite shirt anyway.
One of my favorite pattern companies is Bit of Whimsy Dolls. I accidentally stumbled across her patterns on Etsy one day and tried one out. After that I was hooked and now own several patterns for various dolls and critters. Today I am making her Wittle Whimsy Charlie pattern. Two actually, one for each son for Valentine's Day! These are fantastic because they literally use scraps of fabric so it's a great way to use up what you have. I won't be going over all the directions, if you want to make one for yourself please use the link and purchase a pattern. The directions that Sarah has written are fantastic and easy to follow. I will however, give you a few tips that I have come up with for a few steps in her process. I will warn you though, her patterns are a little like Lay's Potato Chips, you can't get just one!

First I cut away the band on the bottom of the shirt to make the fabric easier to lay flat. Then I laid out my pattern pieces. I only cut out the bodies though, keep reading to see why.
The pattern calls for you to cut out the pieces for the ears, arms, and legs, and then stitch them together 1/8" from the raw edge. I find that it is easier to spray the pattern piece with re-positionable spray adhesive and stick it directly to the fabric instead.
Stick the pattern piece to a double layer of fabric, then pin the layers together to keep them from shifting.
Stitch right around the edge of the pattern piece, keeping as close to the pattern as possible.
When you are finished,
pull off the pattern,
and cut around your stitching. At this point you could turn it so the stitching is on the inside, but the pattern calls for the stitching to show and I really like that look so I'm leaving it as is.
Now with the arms and legs I didn't want them to be too large, so I cut the pattern down to the stitching line and then sewed around the edge. That way once I cut it out it ends up being the original size. Sew around all the arms and legs and then cut out.
Now, for embroidering I find that if the fabric is see through you can easily lay the fabric on the pattern and trace the facial features. If you are using a thicker fabric (like this flannel scrap that I grabbed out of my stash to coordinate with the striped shirt,) then hold it up to a window to see better. Use a water erasable marker to draw so you can get rid of any excess lines later.
The pattern directions call for you to make the entire doll or stuffed animal and then embroider the face when you are finished. Personally, I prefer to embroider before assembly for a few reasons. One, I find it easier to do in a hoop, and two, if I mess up I haven't ruined an entire project. It's just my personal preference though!
Ta-Da! Cute little face...
Now that everything is cut out, embroidered, and pre-assembled, move on and finish the dogs according to the pattern directions.
These little dogs have tags around their necks. I used an embroidery machine to make a letter for each dog so that my boys can tell them apart.
Next I used the adhesive spray and stuck the pattern piece over the letter.
Stitch two layers of felt together, make sure to insert a folded over piece of ribbon between the layers to make the collar.
Cut out the little tags, (but don't cut through your ribbon!) tie them around their necks, and you have a finished project! I can't wait to give my boys their own little dogs for Valentine's day, next I'll be making the coordinating Princess Kitty for my daughter. Then the Mermae, then...
(The doll at the top of this post is Bit of Whimsy's Mae doll, I made it with some of the blue shirt and some of the floral shirt for the skirt. She is being donated to a family in need.)

Tuesday, January 18, 2011

Stained Shirt? No Problem!

Boys are messy. Really, really messy. They think nothing of wiping their mouths and noses on their sleeves, and more often than not end up wearing part of their meal on the front of their shirt. I hate to relegate a shirt to the Saturday bin just because they spill something that doesn't come out, so when I found out about freezer paper stenciling I just had to give it a try! I have to admit, I'm thrilled with the results and can't wait to try more projects in the future!

Project: Freezer paper stenciling
Time: 25 minutes initially, plus drying time
Skill Level: Easy Peasy!

First off, the shirt. It's not terribly easy to see in the picture, but there is a yellowish reddish stain the size of a 50 cent piece on the front, probably some sort of pasta sauce.
Print out a silhouette of whatever image you want on your computer. Just google the name of the image+silhouette and print out what you like best. Make sure to reduce or enlarge your image to the size that best fits your shirt, and remember, you have to cut it out. Simpler designs work better.
Tape it securely to your surface so it doesn't shift.
Cover with freezer paper, tape in place.
Using an exacto knife, begin to cut your image out.
Here it is, the main design cut out. Not quite done yet...
Remember to cut out any pieces that go in your design, like the eyes and nose here!
One finished stencil.
Lay your stencil on your shirt, making sure that the painted area will cover the stain you are trying to disguise. Iron your design on. MAKE SURE THE SHINY SIDE IS DOWN!!! Otherwise your stencil will stick to the iron, not the shirt.
Lay your shirt on a flat surface and insert cardboard inside the layers to keep the paint from seeping through.
I decided to mix two colors for this design, I liked the blue that I was using but decided to add a little black to make the image a little darker. (Also, make sure you use fabric paint, not another kind.)
Using a sponge brush, dab the paint on over your stencil. I like to dab rather than brush to make a nice crisp edge. I also didn't completely cover the image evenly since I was trying to go for a more aged look.
Once covered, let it dry completely. This is the hard part, resist the temptation to pull your stencil off and your image will be cleaner!
And here you go! One fixed shirt. The stain is no longer visible and my son is very excited to wear his new pirate shirt. Make sure to follow the washing instructions on the paint and enjoy!
I'm Linking to:

Tuesday, December 14, 2010

Jeans...Transformed

I have a love/hate relationship with fashion. I love wearing the current styles, but hate having to spend the money to change major parts of my wardrobe when the magazines say I should. Case in point, in recent years boot cut and wide leg jeans were all the rage, now we have moved on to a more tapered leg style. (Which honestly I like better anyway since the boot cut ones always seemed to drag the ground and get soaked on rainy or snowy days.) I owned one pair of the more tapered style, and the rest of my jeans sat unused in the closet. I didn't really want to go out and spend the money on new ones since the ones I had were still perfectly good, but I needed more than one pair of jeans in my closet. One day it hit me... just restyle the ones I already have! I tried this first on a pair of thrift store jeans I already had to make sure it worked, then I was off and running. After all, cutting into relatively new Banana Republic jeans is not for the faint of heart, even if they were on clearance!

Project: Jeans...Transformed!
Time: 1-2 hours
Skill Level: Not too bad (as long as you have a little prior sewing knowledge)

And here they are. What I started with. One pair of Banana Republic jeans that I got on clearance last year for a ridiculously low price. As you can see, they are definitely of the boot cut variety.
Look at the legs of your jeans. You will be working on the standard seam, not the flat felled seam. The standard seam is usually the one that runs down the outside of the leg.
I used a pair of jeans that I already knew I love to get the same leg width on the pair I was transforming. Turn both pairs of jeans inside out and make sure that your standard seam is laying flat. Usually this means that your flat felled inseam is laying on top somewhere, this is fine. Line up the inseams and pin along the edge. Make sure your jeans are laying the same way, not butt to butt or front to front. They should be butt to front or front to butt. Not my best description ever, but you should get the idea!
A little closer view of the inseams pinned. You can see how the flat felled seam comes to the top.
Now, using a marker (I used Sharpie) trace the new leg shape on the pair of jeans you are altering. Make sure to bring your line all the way up past the original seam, taper it in so that you don't have a point at the hip. No one wants that! You won't be taking much out of the hip/thigh area anyway, mine finished well below the pockets.
Put that seam ripper to work! Go ahead and rip out the hems, and get rid of all the loose thread.
Extend your line to the end of the jeans and pin along your marker line.
Stitch along the line with the edge of your presser foot running along the line.
Cut along the marked line. Save the piece you cut off for a bit.
Serge (if you have a serger) or zigzag along the seam to finish it.
Press the finished seam to one side.
Fold your seam back up and pin, stitch back into place. I used a #100 Jeans needle. I also used jeans thread, wind it onto the bobbin and use a matching thread for your top thread. Stitch on the wrong side and the jeans thread shows on the right side of the jeans. STITCH VERY SLOWLY over the sides where the seams come together. These are extremely thick and if you go too quickly your needle will break. Trust me. Do not backstitch, pull the threads through for a finished look. See below for instructions.
Lay the piece you cut off on the other leg, this time lining up the standard seams. Pin and trace with the marker. This way you have the same amount taken out of both legs.
Repeat the process of ripping out the hem, pinning, sewing, cutting, serging, re-hemming etc.
Each hem now has two sets of threads to pull through and tie off. Pull the top thread carefully so as not to break the it, (In my pair the top thread is grey) and your bobbin thread should pop up in a loop. If it doesn't pop up, just use a needle to bring it through. Sometimes they get caught. Usually when you are in a rush.
Use a pin or needle through the loop to pull the bobbin thread through.
Tie 2-3 times and thread through a needle.
Push the needle between the layers of fabric, starting as close as possible to the knot you tied.
Turn your fabric over to make sure your needle is indeed in between the layers.
Push the needle all the way through and pull firmly, this will cause the knot to be buried. Clip your threads. Turn right side out.
Voila! Newly tapered jeans, costing only pennies to transform! I'll bet you have a pair in the closet right now that you can try this out on!